
In this post, I will talk about how to develop a renderer that fits specific production challenges.
Preface
Xwift is a shelf that contains specialized scripts when I was producing my animated film. I want to write some blogs to document them, in case there’s anyone out there that needs some inspiration.
Everything is developed and tested using Maya 2022.
Swift is not (well, not yet) open-source and therefore I will not share the whole script in my post. However, after reading my posts I believe you can implement your own, given some time and effort.
Introduction
Zoetrope, one of my most-used script in my production, is arguably one of the most controversial script I ever wrote.
It is a custom render script I wrote as an alternative for Maya Batch and Maya Render Sequence.
An experienced technical artist might look at Zoetrope and say: This is utterly stupid, I don’t see why it even exists. (and it’s bulky too, 483 lines of code)
And I totally agree. However, it was developed to solve some of critical problems we faced during remote production, and in some sense, it saved my film.
The Story
It was January of the year 2020, and we started to work on a new animated short film using Maya 2017. Little did I knew what was ahead of the future.
It was working fine at first. Two months into production, a global pandemic swept over the entire United States. My school, University of Washington, was the first school in the U.S. that shut down the campus and the entire production had to went remote.
Soon as I started to light some of my scenes, Maya 2017’s Arnold RenderView stopped working with remote desktop. The only thing I got with Arnold RenderView when doing remote work was a white screen, like so:
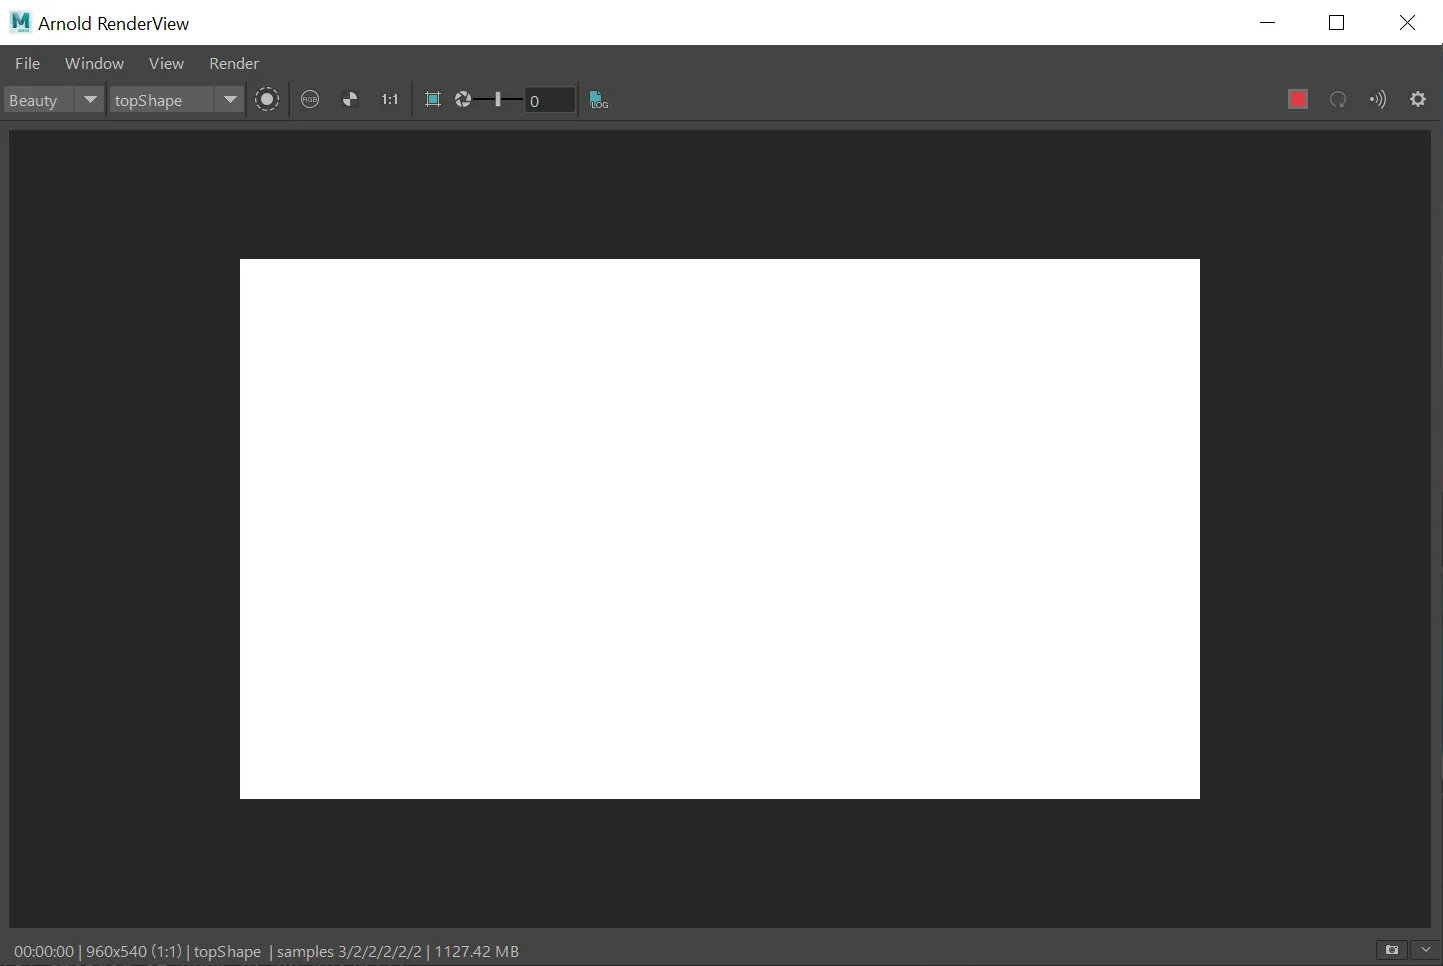 A picture with a broken Arnold RenderView
Any lighter can confirm this is like chopping off the legs of a marathon athlete (ok this is terrible metaphor but you get my point).
But the production had to continue, so the naive initial workaround was: Put some lights in the scene, render it, then save it to desktop and open the image.
It’s a blind guess, considering the amount to scenes we needed to light (8 sequences, 81 shots), is is just simply too much.
Render One Frame
It is natural, then, to think about writing something that renders a frame out and save it by clicking of a button. And that was what I did in the beginning.
This is the guts of rendering out a frame using command line:
# Render a frame into scene_folder/renders/render_layer/ folder.
def naive_render_one_frame(width, height, file_format="tif", render_layer="defaultRenderLayer"):
    frame = cmds.currentTime(query=True)  # current frame on timeline
    file_dir = (sceneName().parent + "\\renders\\" + render_layer).replace('\\', '/')
    arnoldRender(width, height, True, True, 'render_cam', ' -layer ' + render_layer)
It is essentially doing the same thing as Maya Render Sequence, but only rendering one frame.
Say if I have a scene called scene.ma and I am currently at frame 24, then it renders out an image under:
|scene.ma
|renders
    |defaultRenderLayer
        |scene_1_0024.tif (I will talk about the _1_ later)
Now that I have the power to render out one frame, I can extend that to render out an entire sequence.
Changing range using Timeline vs. Render Settings
In practice, I found it much more useful if I am going to render on multiple machines, to control the range of render on each machine using the Timeline slider.
Say I have 6 machines, and I want to render out a scene with frames 1-120. Using elementary school algebra, each machine will render 19 frames and the last machine will render 20 frames.
A traditional workflow would be:
1. Open the scene on each computer
2. go to render settings
3. calculate start and end frame
4. Open Render Settings
5. type in start frame
6. type in end frame
7. close render settings
8. change workspace to render
9. render - render sequence or batch render.
My proposed workflow that controls the range of render using the inner padding of the timeline is:
Save the scene with inner padding of timeline 1-20 and outter timeline 1-120.

On each machine:
1. Slide the inner padding of the timeline to 1-20, 21-30, ...
2. Click a button that renders out the sequence
 TimeLine Padding mentioned above
Much easier!
So all there is left to do is develop a function that renders out the sequence using timeline.
Preparation
Getting Timeline
First, let’s get the range of the timeline. Here’s a handy class:
class TimelineProperties:
    @property
    def START(self):
        return playbackOptions(q=1, animationStartTime=1)
    @property
    def END(self):
        return playbackOptions(q=1, animationEndTime=1)
    @property
    def INNER_START(self):
        return playbackOptions(q=1, minTime=1)
    @property
    def INNER_END(self):
        return playbackOptions(q=1, maxTime=1)
Using this class is also very easy. Take an example that gets the start of the inner padding:
inner_padding = int(TimelineProperties().INNER_START)
Piece of cake!
Getting Other Scene Information
We also need some other information about the scene. These values come directly from the render settings.
I included three functions to get thr resolution, padding, and frame rate.
# Getter Methods
def get_resolution_settings(attr):
    """
    attr = "width" or "height".
    Returns an int of the current width or height of the current render settings.
    """
    return cmds.getAttr("%s.%s" % ("defaultResolution", attr))
def get_padding():
    """
    Returns an int of the current frame padding in the render settings.
    """
    return cmds.getAttr("defaultRenderGlobals.extensionPadding")
def get_frame_rate():
    """
    Returns an int of the framerate of the current scene.
    """
    # Framerate Info
    FRAMERATE_INFO = {"game": 15, "film": 24, "pal": 25, "ntsc": 30, "show": 48, "palf": 50, "ntscf": 60}
    current_time = cmds.currentUnit(query=True, time=True)
    return FRAMERATE_INFO.get(current_time)
Cleanup: Caching defaultArnoldDriver_pre
Here’s a bug I found after using the render one frame function. We needed to specify a render_layer in order for the function to work.
In order to render the master layer, I set it to defaultRenderLayer.
But then, after that, no matter if you use batch or sequence render, running the render one frame code seem to override the layer settings in the render settings.
If you are rendering out a scene in several layers later, this becomes a pain since you can’t anymore.
Turns out, we need to toggle an attribute called defaultArnoldDriver_pre.
What we then need to do, then, is get this attribute before we render a frame, cache it, render a frame, then set defaultArnoldDriver_pre back to the cached value.
In order to do that, let’s make a global value called DEFAULTARNOLDDRIVER_PRE so both the cache function and set function can access and modify it.
global DEFAULTARNOLDDRIVER_PRE
DEFAULTARNOLDDRIVER_PRE = ""  # Initialize

def cache_defaultArnoldDriver_pre():
    # Returns an string of the defaultArnoldDriver.pre
    global DEFAULTARNOLDDRIVER_PRE
    DEFAULTARNOLDDRIVER_PRE = cmds.getAttr("defaultArnoldDriver.pre")
    print("[Zoetrope] Successfully get and cached Driver settings: " + DEFAULTARNOLDDRIVER_PRE)
def set_defaultArnoldDriver_pre():
    # Sets the defaultArnoldDriver.pre to its original state.
    cmds.setAttr("defaultArnoldDriver.pre", DEFAULTARNOLDDRIVER_PRE, type="string")
    print("[Zoetrope] Successfully reset Driver settings to original: " + DEFAULTARNOLDDRIVER_PRE)

cache_defaultArnoldDriver_pre()
# TODO: Do frame render
set_defaultArnoldDriver_pre()
Toggle Render Settings
Not necessary, but here are a couple settings that helps when rendering. You should at least have a function that toggles the scene to your specific rendering requirements. Here’s mine that sets the rendered image name to name_#.ext:
def toggle_render_settings():
    # This controls the "_" in the padding, 0 for nothing, 1 for ".", and 2 for "_".
    cmds.setAttr("defaultRenderGlobals.periodInExt", 2)
    # This controls the "ext". Setting this to 0 makes name_#.ext while 1 makes name.#
    cmds.setAttr("defaultRenderGlobals.outFormatControl", 0)
    # This controls whether you want to render a single frame.
    # 0 for single frame, and 1 for the animation.
    cmds.setAttr("defaultRenderGlobals.animation", 1)
    # This controls whether you want the extension or the frame number to go first in the file name.
    cmds.setAttr("defaultRenderGlobals.putFrameBeforeExt", 1)
    # This controls whether you want the extension ".ext" to be in your image name at all.
    cmds.setAttr("defaultRenderGlobals.outFormatControl", 0)
    print("[Zoetrope] Set Padding - Render settings correctly set.")
Implement Sequence Rendering
GUI
In a former post, I talked about how Maya does not support multi-thread processing. For our purposes, just know that once Maya starts rendering, that’s the only thing it can do, so the Maya window will freeze. There’s noway to kill it other than go to task manager and kill the Maya process. This is one of the limitation of Zoetrope.
One of the most common mistake I made was setting the render range wrong. Therefore, a little GUI that ask the user to confirm the range they want to render is handy. A simple dialog box will do.
msg = "Will render from frame " + str(renderStart) + " to frame " + str(renderEnd) + ". Are you sure?"
prompt_start = cmds.confirmDialog(title='Confirm Render', message=msg, button=['Yes', 'No'],
                                    defaultButton='Yes', cancelButton='No', dismissString='No')

if prompt_start != "No":
    # TODO: Start rendering

    # Exit message.
    cmds.confirmDialog(title='Xwift Zoetrope: Task Finished.',
                       message='Successfully rendered all requested layers into target directory.',
                       button=['I got it!'], defaultButton='I got it!', dismissString='I got it!')
Render the Selected Range
Implementing the render selected range is nothing but a loop that executes a fancier version of render_one_frame over and over again.
# Set the start of the render range.
current_frame = renderStart

# Do render
while current_frame <= renderEnd:
    # Set current time to the target render frame.
    cmds.currentTime(current_frame)
    # Proceed with render the frame
    render_file_status = render_one_frame(width, height, current_frame, target_format, layer)
    # render_one_frame() will catch any error occurs.
    # So render_file_status returns True if rendered successfully, and False if failed.
    if not render_file_status:
        print("[Zoetrope] ERROR checking last render image, attempting to restart render again.")
    else:
        current_frame += 1
That’s all the guts for implementing the algorithm.
However, there are a couple more things that can make it better.
Improvements
Cleanup: Check render size
I had this problem every once and a while that somehow Maya just skips a frame when rendering the sequence. Like this:
|scene.ma
|renders
    |defaultRenderLayer
        | scene_0001.tif - 2048KB
        | scene_0002.tif - 1KB  (skipped)
        | scene_0003.tif - 2048KB
Then, I will have to come in and re-render that frame.
But that is a task that can simply done by computer using a simple file size check:
def render_one_frame(width, height, file_format="tif", render_layer="defaultRenderLayer"):
    # TODO: Do preparation
    # TODO: Do Render
    # TODO: Do rename _1_ (Will talk about this below)

    # Not a robust solution since this cannot detect partially rendered images.
    # But should keep unrendered images off the pipeline.
    if os.stat(postfix_image_dir).st_size > 2048:
        return True
    else:
        return False
Way to Interrupt
As mentioned above, Maya will freeze while doing work, and there’s no easy way to stop it. We need to implement a way to at least be able to interrupt the loop in between each frame’s render.
I am using a stupid method:
In each iteration of the above loop, if Maya detects a stop file named simply stop_render_YES.txt, it will break the loop.
Why, as some of you ask, can’t we just make a dialog box with a stop button?
Well, because as mentioned, Maya cannot do multi-thread processing.
Rendering and maintaining a dialog box that constantly checks if the user pressed a button is two threads in a same time.
I know what you want to ask, the answer is Maya will literally crash if try to implement it with QThreads.
Dirty programming, but working programming.
We need two functions, one that makes a file called stop_render_NO.txt, and one that checks the stop file.
def make_stop_txt_file(render_layer):
    """
    Makes a text file called "stop_render_NO.txt"
    """
    render_path = (sceneName().parent + "\\renders\\" + render_layer).replace('\\', '/')
    f = open(os.path.join(render_path, "stop_render_NO.txt"), "w+")
    f.write("To stop Zoetrope from rendering next image, rename this file to stop_render_YES.txt. ")
    f.close()
def check_stop_txt_file(render_layer):
    '''
    Checks if a directory contains a "stop_render_NO.txt".
    '''
    render_path = (sceneName().parent + "\\renders\\" + render_layer).replace('\\', '/')
    if not os.path.exists(os.path.join(render_path, "stop_render_NO.txt")):
        if os.path.exists(os.path.join(render_path, "stop_render_YES.txt")):
            print("Stop file exists. User requested Zoetrope to pause after this iteration.")
            return True
        else:
            make_stop_txt_file(render_layer)
            check_stop_txt_file(render_layer)
    else:
        print("No user stop render request found. Proceed with next render.")
        return False
With these, we can integrate them into the beginning of the while loop mentioned above.
while current_frame <= renderEnd:
    # Check the stop file to see if the user wants to abort.
    layer = "defaultRenderLayer"
    if check_stop_txt_file(layer):
        print("User attempt to break the loop during the start of a render cycle. Aborting.")
        break
    ...
The _1_ bug
Here’s another thing Maya does that is annoying:
- If you render out an image with
Maya Batch Renderer, the image will come out asimage_0000.tif. - However, if you render out an image (or sequence) with
Maya Render Sequence, every image comes out asimage_1_0000.tif.
I don’t know what is causing it, but it is annoying from a perfectionist’s perspective. Zoetrope, who uses the same method as Maya Render Sequence, also plagued with this problem.
Then, what we need to do, is add some extra lines in render_one_frame that renames the render once it is finished and created.
Easier said than done, here’s how:
def render_one_frame(width, height, file_format="tif", render_layer="defaultRenderLayer"):
    # TODO: Do preparation

    file_dir = (sceneName().parent + "\\renders\\" + render_layer).replace('\\', '/')
    bug = "_1_"  # idk whyyyy does this happen
    prefix_image_dir = file_dir + "\\" + prepend + bug + "{:0>4d}".format(frame) + "." + file_format
    postfix_image_dir = file_dir + "\\" + prepend + "_" + "{:0>4d}".format(frame) + "." + file_format

    # TODO: Do Render

    if os.path.exists(postfix_image_dir):
    os.remove(postfix_image_dir)
    if not os.path.exists(postfix_image_dir):
        print("Frame Renderer - Image exists at: " + postfix_image_dir + " and got deleted successfully.")
    os.rename(prefix_image_dir, postfix_image_dir)

    # TODO: Do cleanup
Conclusion
Working code is better than broken code. Go dirty if it can make things happen.
I hope this is helpful.
If you want to quickly say hi just shoot me a message using the contact portal.


